Causes and prevention of high-strength bolt breakage
During the service of high-strength bolts, breakage is extremely harmful and is the most fatal failure form of fastening connections.
Today, Engineer in Ningbo Teng Qi Fasteners Co., Ltd explains the main characteristics and identification of macroscopic observation of various fracture forms that often occur in high-strength bolts during service.
At the same time, from a manufacturing perspective, control methods to prevent its occurrence are introduced.
Identification of fracture patterns and characteristics of high-strength bolts
During the service of high-strength bolts, four common fracture forms are: overload fracture, brittle fracture, delayed fracture, and fatigue fracture.
1. Overload fracture
Overload fracture – when the axial tensile stress endured by a high-strength bolt exceeds the tensile stress that its dangerous section can withstand, the fracture that occurs is called overload fracture. This fracture form is often a plastic fracture.
Macroscopic characteristics and identification of fracture surfaces
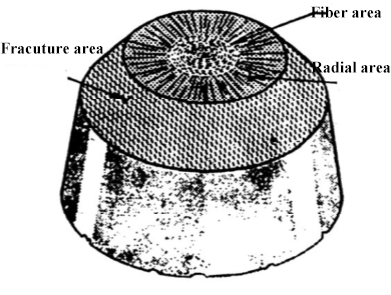
This kind of fracture is similar to the fracture in the tensile test. The fracture surface has obvious plastic deformation, a “necking” phenomenon, and a “cup and cone” shape. When the plasticity is good, there will also be an angle of approximately 45º between the cup and the axis.
Observing the fracture surface, it can be found that the cross section is rough and dark gray, and the cross section is “fiber” or “goose feather” velvety, with fiber areas, radial areas and fracture areas appearing at the same time (see the figure below).

2. Brittle fracture
Brittle fracture – Generally, a fracture in which the cross-section shrinkage of a high-strength bolt is less than 5% (no obvious plastic deformation) is called a brittle fracture.
Macroscopic characteristics and identification of fracture surfaces
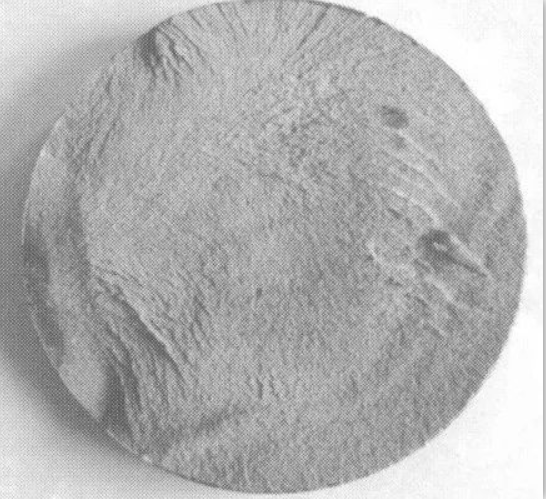
The fracture is flat and bright, often with radial, herringbone or bright crystal shapes. Under the light, it can be seen shining brightly
crystallographic facets (also called facets). This kind of fracture can be easily restored by anastomosis. (As shown below)

prone areas
It is easy to occur at the joint part of the head rod of high-strength bolts and the screw rod.
3. Delayed fracture
Delayed fracture is a phenomenon in which high-strength bolts undergo brittle fracture after a certain period of time under the action of static stress.
Macroscopic characteristics and identification of fracture surfaces
The fracture surface is generally in the shape of rock candy, and the fracture surface is divided into two areas: brittle fracture zone and instantaneous fracture zone. The fracture surface in the brittle fracture zone is basically consistent with the characteristics of brittle fracture. The fracture surface is brand new, flush, and has no plastic deformation. The cross section is relatively rough, the fracture area is crystalline and granular, there are tearing edges (radial edges), and the metal color is bright.
The cross-section metal in the instantaneous fracture zone is dark gray and fibrous, and sometimes there is an unobvious shear lip. The crystal surface at the fracture surface sparkles under the light.
prone areas:
It easily occurs in the heads of high-strength bolts, transition areas between polished rods and threads, and screw rods.
4. Fatigue fracture
Fatigue fracture – refers to the local structural changes and the continuous development of internal defects caused by high-strength bolts when they are subjected to alternating cyclic stress or strain, resulting in a decrease in mechanical properties and eventually complete fracture. This process is called fatigue fracture.
Macroscopic characteristics and identification of fracture surfaces
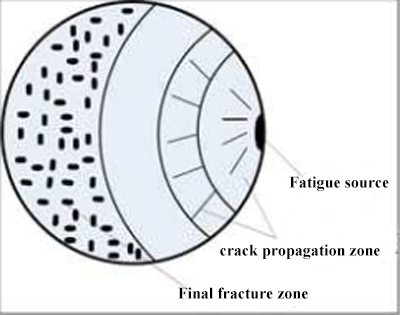
There is no obvious plastic deformation phenomenon at the fracture surface, and the fracture surface consists of two parts: the fatigue fracture zone and the final fracture zone (as shown in the figure below).

The fatigue fracture zone is composed of fatigue source and crack expansion zone. The grains of the fracture surface in this area are finer and smooth, and sometimes appear as a bright grinding surface.
Observed with a magnifying glass, growth rings, also known as “shell” patterns, are visible, which are also the main features for determining fatigue fractures.
In the final fracture zone, the cross section is uneven, rough, dark gray, and a shear lip appears at the edge.
prone areas
It is easy to occur in the head of high-strength bolts, the transition area between polished rods and threads, and the first thread of the thread that is subject to the greatest stress when the thread and nut are matched.
Prevention of high-strength bolt fractures
Based on the causes of various fracture forms of high-strength bolts, effective prevention during the manufacturing process can greatly reduce the probability of fracture failure during service and avoid the occurrence of batch quality accidents.
| Fracture form | Fracture cause | Fracture prevention |
|---|---|---|
| Overload fracture | The dangerous cross-section size (small diameter of the external thread) is unqualified or the head height size is unqualified (over-height difference) | According to the product requirements, in the manufacturing process to strictly control the screw thread diameter and head height size of the phenomenon of overdeviation. |
| Core hardness is low after heat treatment | Reasonable design of heat treatment quenching temperature, holding time, quenching medium and mesh strip thickness to ensure the hardenability of bolts. | |
| Friction coefficient unqualified (low) | Strictly 1) Control the size of bolt bearing surface; 2) Control thread, bearing surface and total friction coefficient. | |
| Brittle fracture | Raw material carbon, phosphorus, sulfur, hydrogen and other elements exceed the standard | Select high-quality steel raw materials, while strictly do a good job of incoming inspection of raw materials, increase low-fold tissue defect detection items, to avoid the use of unqualified inferior materials. |
| Raw material grain boundary segregation, non-metallic inclusions (sulfide, alumina, spherical oxides), ribbon structure exceeded the standard, the center loose. | Select high-quality steel raw materials, while strictly do a good job of incoming inspection of raw materials, increase low-fold tissue defect detection items, to avoid the use of unqualified inferior materials. | |
| The austenite grains are coarse and the metallographic structure (westenite structure) is abnormal. | Reasonable design of bolt hot heading forming and hot quenching heating temperature. | |
| There is phosphorous accumulation on the bolt surface, which induces brittle fracture. | The concentration of dephosphorization solution in dephosphorization tank of heat treatment equipment should be regularly checked to ensure that dephosphorization solution is added in time. At the same time, the dephosphorization status of bolts was tested. | |
| Bolt surface carburization (high carbon content) | 1) Reasonable design of heat treatment process and reasonable setting of carbon potential value. 2) Regularly calibrate and maintain the oxygen probe. | |
| 1) Improper tempering temperature, resulting in tempering brittleness. 2) Improper tempering cooling. | 1) Try to use a higher tempering temperature, avoid using a tempering temperature below 425 ° C, and avoid the metal tempering brittle area. 2) After tempering, water should be cooled in time to avoid tempering brittleness. | |
| The design of metal deformation in each step of bolt cold heading forming is unreasonable, the cross section transition of bolt is folded, the R Angle is small, and there is stress concentration. | Reasonable design of metal deformation in each step of bolt cold forming to avoid stress concentration. | |
| Delayed fracture | After surface treatment, the hydrogen content is high and hydrogen embrittlement delayed fracture occurs. | 1) For galvanized products with strength above 9.8 (including surface carburizing) and phosphating products with strength above 10.9, strictly control pickling time and acid concentration, and carry out dehydrogen treatment at the same time; 2) Dehydrogenation of galvanized products with high carbon content or martensitic metallographic structure. 3) Reasonable control of bolt hardness and tensile strength range; 4) Select materials with low hydrogen embrittlement sensitivity; 5) Ensure the tempering time to ensure the removal of bolt quenching stress. |
| Dehydrogenation time is insufficient or not timely | According to the time and requirements specified in the standard, standardize the dehydrogenation operation. | |
| There is carburization on the surface of the bolt | 1) Reasonable design of heat treatment process and reasonable setting of carbon potential value. 2) Regularly calibrate and maintain the oxygen probe. | |
| Bolt transition R Angle irregular or unqualified (too small) | 1) Ensure that the R Angle of the mold is smooth and the surface roughness is high; 2) The control mold R fillet size is qualified and in the middle upper limit size. | |
| There is phosphorous accumulation on the bolt surface | The concentration of dephosphorization solution in dephosphorization tank of heat treatment equipment should be regularly checked to ensure that dephosphorization solution is added in time. At the same time, the dephosphorization status of bolts was tested. | |
| Fatigue fracture | There are micro cracks on the surface or inside of the bolt | 1) Control the surface cracks of raw materials to avoid extension after quenching. 2) Magnetic powder and ultrasonic flaw detection for important parts after heat treatment. |
| Bad metal flow line under head | 1) Reasonable design of cold heading deformation ratio. 2) Reasonable design of each step of the mold R rounded corners. | |
| The subcephalic R Angle is small, irregular and rough in surface | 1) Mold R Angle value design as close to the upper limit as possible; 2) Mold R rounded corners should be polished to a smooth arc; 3) After fatigue turtle cracks appear in die R round heading, the die should be trimmed or replaced in time. | |
| The thread is folded or the tip is cracked | 1) When rolling wire or rolling wire, the teeth should be correctly matched and can be operated only after complete anastomosis; 2) Reasonably design the feed speed of wire rolling and rolling to avoid cracking of the thread during extrusion. 3) Ensure that the cooling lubrication of the rolling wire or rolling wire is sufficient. | |
| The thread surface is decarburized | 1) Control the surface decarbonization of raw materials; 2) Set the carbon potential value reasonably to avoid decarburization caused by quenching. | |
| There are micro cracks at the bottom of the thread teeth | 1) Thread machining is carried out with thread cutting tools with circular arc bottom. 2) Ensure sufficient cooling and lubrication in the process of wire rolling and rolling to avoid surface micro-cracks in threads. |

